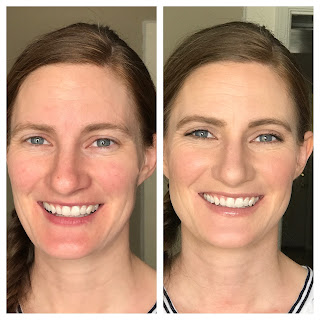
It took me five minutes to create this look on my adorable friend. How can you get such a gorgeous finish with just five minutes?! First of all, Mascara makeup. And second of all, highlighting and contouring. Don't be scared! Stick around and I will explain to you why you need to contour and how you can do it all by yourself!
As you can see, this is a beautiful and natural every day look. To do her face, we only needed four products. I used a cream foundation. Ok ok ok. Stop right there! I know, cream is "bad". Cream is "cakey". Cream is "oily". This is not true! Cream is soft, cream is blendable, cream is natural looking!
I used a highlight color called white peach on her chin, lower cheeks, under her eyes, her nose, and the center of her forehead. We used an extremely light layer. This saves you from that cakey look. With the Maskcara beauty line, the highlights have a yellow undertone. This will cancel out the redness so many of us deal with as well as the purple tone when we have those, oh so lovely, bags under our eyes.
I applied a cream contour, her shade is ash, under her jawline, right under her cheek bones, down the sides of her nose, and across the top of her forehead. The contour from Maskcara actually has coverage like a foundation. It also is an ashier tone vs. a bronze tone like you typically see in a contour. This creates natural shadows on the face which make your cheeks pop and add dimension to your face. You're just not going to get that dimension with a traditional flat foundation!
To bring color back to her face, I applied nude blush just to the apples of her cheeks. I also added this color to her lips. Who doesn't love a multi-tasking product!
Our finishing touch was a light swipe of Maskcara's pearl illuminator on top of her cheekbones and just a smidge down the center of her nose. Illuminator brings a glow to your face like you wouldn't believe!
Four products. That's it! Please tell me you believe me! If you still need convincing, check this out for yourself!


0 comments:
Post a Comment